MailStore Client Deployment
Using a software distribution system, MailStore Client can be distributed among the users’ computers automatically. To be able to do so, the distribution system must be able to execute MailStore Client’s setup program without requiring any input or confirmations.
Using Group Policies
Installation
In addition to being installed manually, MailStore Client can also be distributed to all user computers using Active Directory. Once the distribution process is set up successfully, MailStore Client will be installed automatically when the user logs on. This process runs in the background and requires no action on part of the user. Immediately after the distribution, the user can start and use MailStore Client as usual. A shortcut icon on the desktop is created automatically.
Example: Setting up distribution in Windows Server 2003
- The MailStore Client MSI setup file is bundled with the MailStore Server installation. You can either find it via the link on your desktop Install MailStore Client on other Computers or in the Setup- subfolder of your MailStore Server program folder.
- Copy the MailStore Client MSI setup file in a directory on the server that is released and accessible to all users of the domain.
- Open the Group Policy Management Console. If this is not available, download the installation routine under http://www.quikbox.com/?gpmc.
- Install the console.
- Open the group policy management console of the Windows server
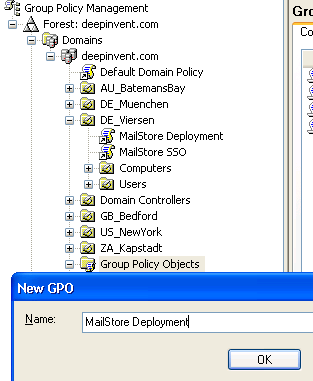
- Right-click on the administrative folder Group Policy Objects, select New and create a new group policy object calledMailStore Deployment.
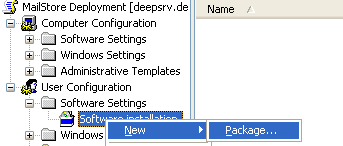
- Highlight the new object and click on Edit. Expand User Configuration and Software Settings and right-click onSoftware installation. Select New and Package...
- Select an MSI package. Please keep in mind that the path for the file must be entered in UNC notation (e.g. ServerSetupMailStoreClientsetup...) and that the users of the domain have to have read-access to this directory share.
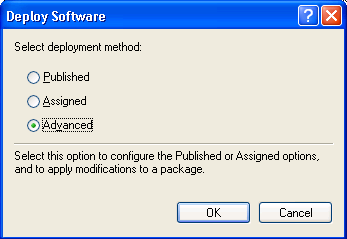
- In the following dialog window, select Advanced and click OK.
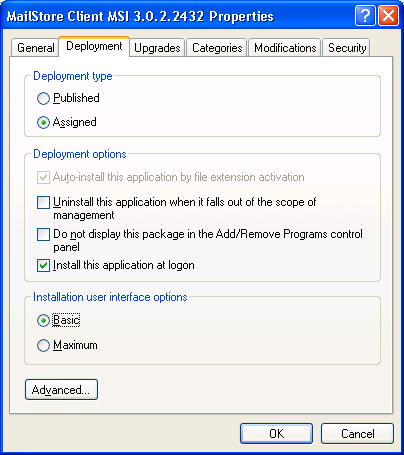
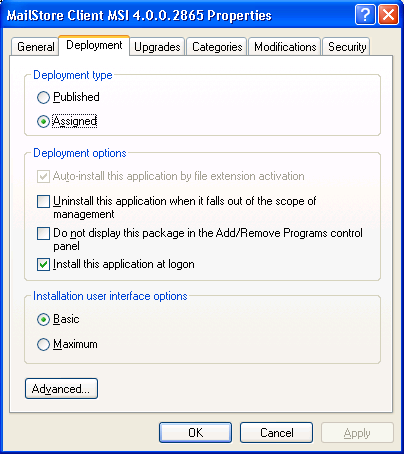
- On the next screen, please select the settings as shown below:
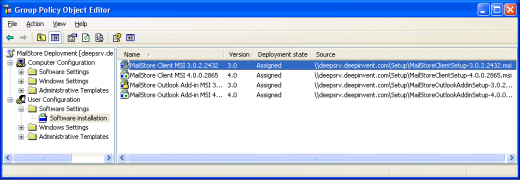
- Click on OK to confirm all settings. The group policy should look similar to the one shown below:
- Close the group policy editor. The group policy is now configured and can be linked to the corresponding user objects. Linking is done using organizational units (OU).
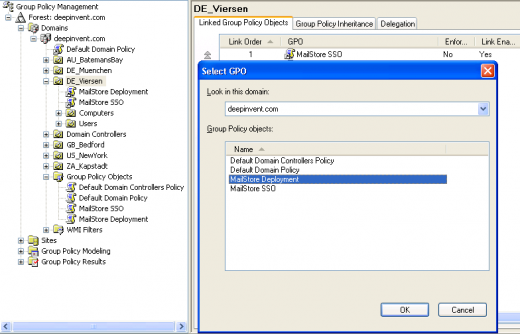
- Highlight the organizational unit (OU) which contains the desired user objects, right-click on the OU (DE_Viersen in the example below) and select the option Link an Existing GPO. In the dialog window Select GPO, highlight MailStore Deployment and click on OK.
- The group policy is now available and becomes active the next time users log on to the Windows client.
Updating
With group policies, the MailStore Client software on the user machines can be updated automatically. This becomes necessary if MailStore Server is updated because the server can only be accessed by clients with the same software version. To edit an existing MailStore deployment group policy so that an automatic update of the clients can be performed, please proceed as follows:
- Open the existing group policy MailStore Deployment. Create a new package and select the updated MailStore Client MSI file. In the following dialog window, select Advanced and click on OK. Please select the settings as shown below:
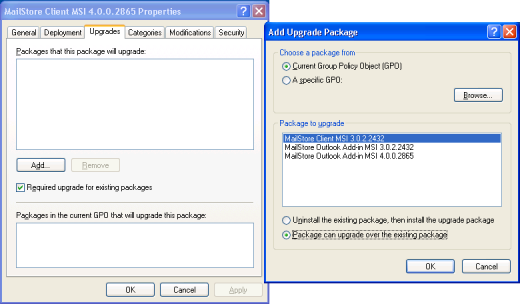
- In the Updates tab, click on Add and select the software to be updated. Choose the settings as shown below and click on OK and confirm by clicking on OK again.
- The group policy should look similar to the one in the following graphic:
MailStore Client will be updated the next time users log on to their Windows workstations.
To avoid complications when installing software using group policies, the following settings for the MailStore Deployment group policy should be adjusted as well:
- Activate Computer Configuration/Administrative Templates/System/ScriptsRun logon scripts synchronously
- Activate Configuration/Administrative Templates/System/LogonAlways wait for the network at computer startup and logon
Configuration
If Mailstore is used within an Active Directory infrastucture, MailStore Client or the MailStore Outlook add-in (starting with MailStore Server 5.x) can be configured using group policies.
For this purpose, group policy templates are available: For domains in Windows 2003 mode or older, there is an ADM-template, for domains in Windows 2008 mode or newer, an ADMX-template. The configuration of MailStore Client and the MailStore Outlook add-in is the same for both templates.
Installing the ADM Template
The ADM-template is used for managing group policies on machines running Windows 2003 Server or older. To install the ADM template, please open the group policy management console. (If the group policy management console is not yet installed on your system, you can download it under http://www.quikbox.com/?gpmc.)
Please proceed as follows:
- Download and save the ADM-template.
- Open the group policy management console
- Right-click on the Group Policy Objects folder
- Click on New and create a new group policy object named MailStore Client Settings
- Right-click on the new object and select Edit
- In the user configuration, right-click on Administrative Templates and select Add/remove templates...
- Click on Add and enter the path for the ADM file
- Click on Open and then close the dialog window
- The installation of the ADM template is now complete
Installing the ADMX Template
The ADMX-template is used for managing group policies on machines running Windows 2008 Server or newer. To install the template, please open the group policy management console.
Please proceed as follows:
- Download and save the ADMX-template
- In Windows Explorer, navigate to the folder %systemroot%sysvoldomainpoliciesPolicyDefinitions
- Copy the ADMX Template into this directory
- Copy the ADML Templates from the subfolders (de-DE, en-US) into the corresponding directories
- Close Windows Explorer
- Open the group policy management console
- Right-click on the Group Policy Objects folder
- Click on New and create a new group policy object called MailStore Client Settings
- Right-click on the new object and select Edit
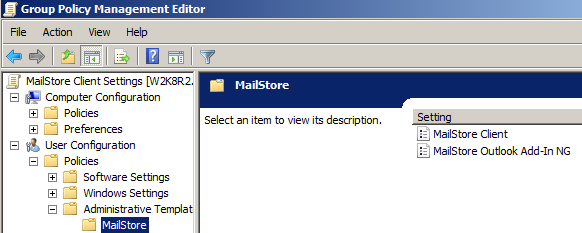
- In the user configuration, click on Policies and Administrative Templates and select the MailStore template
- The installation of the ADMX Template is now complete
Configuring MailStore Client
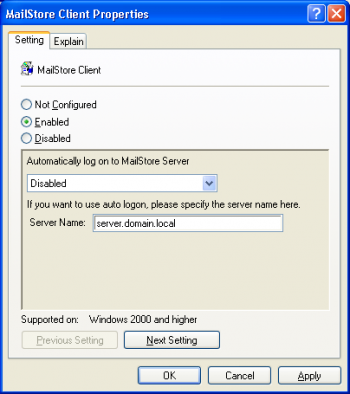
It is possible to set up the hostname or IP-Address of your MailStore Server and whether the MailStore Client should automatically login to your MailStore Server.
- Use Autologon to MailStore Server
- Enables or disables the AutoLogon function
- Server Name:
- In case AutoLogon is enabled, you should also tell the MailStore Client to which server it should connect. The format can either be the hostname or an IP-Address. If MailStore Server is listening on other that the default ports, it is required to add the port information to the hostname or IP-Address in the format :port.
Uninstalling
Group Policy distributed installations
Just like the distribution, the uninstalling of the software packages can be done using group policies. Please proceed as follows:
- Open the group policy management console of your Windows server.
- Expand the folder Group Policy Objects.
- Right-click on the group policy object which was created for the software distribution of MailStore and select Edit.
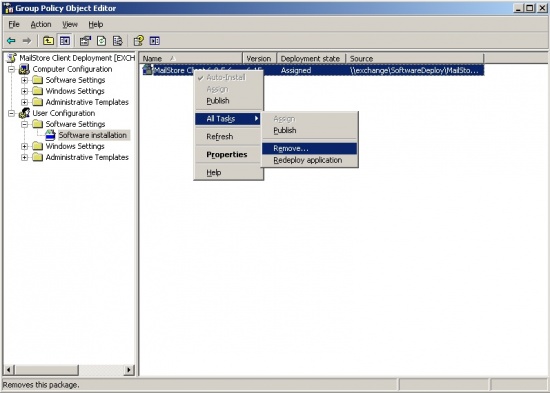
- Expand User Configuration | Software Settings | Software Installation
- Right-click on the packet to be uninstalled and select All Tasks -> Delete...
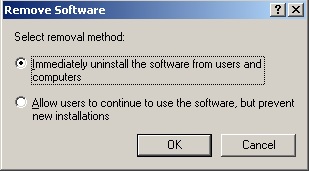
- In the following dialog window, select Software sofort von Benutzern und Computern deinstallieren and click OK.
- Close all open windows and exit the group policy editor.
- The software will be uninstalled the next time the user logs on to the server.
Manually or not via GPO distributed installations
For un-installing a MailStore Client application that was not deployed via Group policy, please follow the steps below:
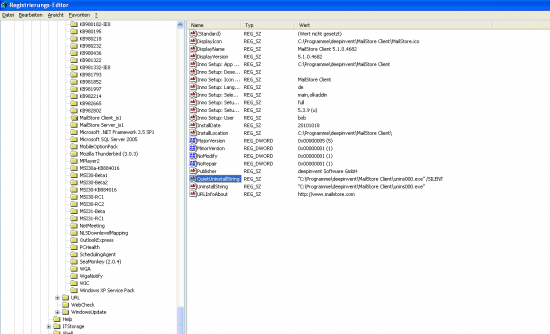
- First determine the setup path and parameters. Therefore open the Registry Editor on one of the client PCs and search / open the following key:
"HKEY_LOCAL_MACHINESOFTWAREMicrosoftWindowsCurrentVersionUninstallMailStore Client_is1".
- Copy the key value "QuitUninstallString" (e.g. "C:Program FilesdeepinventMailStore Clientunins000.exe" /SILENT) to a new editor window and save the file as mailstore_uninst.bat.
- Paste the mailstore_uninst.bat file to the NETLOGON Share of your server
- Open the Group Policy Management console
- Create a new GPO and name it "MailStore Client Uninstall", then link it either to the domain or to the OUs that contain the user objects that have the MailStore Client installed.
- Right click the new GPO and choose "edit.."
- Expand the tree Computerconfiguration | Windows Settings | Scripts
- Right click "Startup" and choose Properties
- Click "Add..." and then "Browse..."
- Pick up the mailstore_uninst.bat from the NETLOGON-Share and choose "open"
- Save all settings and close the GPO Editor Windows
- Finally open a command prompt and enter "gpupdate /force" to update the group policy setting
During the next startup of a client machine the GPO will take affect and the MailStore Client will be un-installed unattended.
Now you can create a new GPO for deploying the new MailStore Client MSI. For further information please take a look at MailStore Client Deployment - Installation.
Without using Group Policies
Please refer to this Microsoft’s TechNet article to find more information about the Windows installer and msiexec’s command line parameters.
